Installing a Tree Pro Protector
TREE PROTECTOR
Same as a Miracle tube once reformed into a cylinder with 5 provided zip ties. Easy to clean out leaves and easier to remove from the seedling when ready to do so.

60'' TREE PROTECTOR
Tree Protectors will provide a healthy growing environment for your seedlings. The more site preparation, mowing, mulching, and weed management you do, the greater your planting success will be. A fast growing tree, is a healthy tree. Time spent removing the seedlings competing grasses and broadleaf weeds in an area of at least 3 feet in diameter, will greatly increase the seedlings growth.
Assembly:
Start by reforming the flat and open protector into a cylinder, using zip ties that are provided. With the holes of the Tree Protector lined up, slide the zip ties through both holes in each side wall and secure the zip tie with two or three clicks to keep it in place. ( This can all be done more comfortably indoors out of the wind and weather, and long before your seedlings arrive.
Once your seedlings are planted and you are ready to put the tree Protectors on your seedlings I have listed two different but similar ways of installing the protectors.
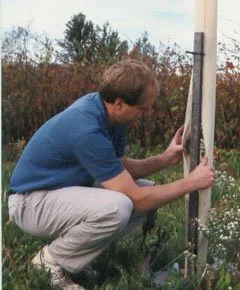
#1 Place your stake 2.5 inches from your seedling. Place the stake on the side with the strongest prevailing winds.
Remember that the vent holes go up and that the solid half of the protector goes towards the ground.
As you begin to place the Tree Protector down over the top of the seedling, first lower the protector’s zip ties over the top of the stake as you lower it carefully over the seedling. Ensure that all the branches are bunched up and still pointing upwards as you lower the protector over the seedling itself.
Push the bottom of the protector loosely into the ground.
Once the protector is touching the ground tighten the zip ties to secure them to the support stake.
A 60’’stake does not have to be attached to the top zip tie on a 60” Tree Protector. The top zip tie simply holds the tube together. The stake must be 2 or 3 inches above the second zip tie down from the top. If you are using a longer stake you can attach it through the top zip tie.
Fold back the tabs on the top of the tube to remove sharp edges away from the tender bark of the tree.
Place the provided bird net over the top of the tube to keep birds from entering the tube.
#2 If you prefer, prior to planting, you can place the stake through the zip ties and pull the zip ties snug enough to hold the stake in place, but not so tight that you can’t pound the stake into the ground once you are ready to install them. This method allows you to look down through the inside of the tube, and center the seedling’s trunk, at ground level, in the middle of the tube.
First you flush the bottom of the stake and the tube.
Second, you slide the tube over the seedling carefully to avoid scratching the tender bark of the seedling.
Third, while holding the attached stake with one hand, you look down the tube and center the seedling as discussed above. Holding the stake in place ensures that the seedling is centered in the middle of the tube. Now, use a hammer or 3 pound, short handled, sledge hammer, (available at Menards) and pound the stake into the ground. Once the stake is secure, you finish by pulling the zip ties tight against the stake. At this point you can bend the top tabs outboard which will provide a rounded edge when the seedling grows out of the tube. Lastly, place the bird net over the top of the tube.